
Post
The Right Way to Install Pixels in Shopify
Installing your pixel correctly is critical to your Shopify store’s success. But doing so depends on your store and your pixels.
Kevin McLaughlin
10 min read
We've picked out our analytics and marketing tools. We're going to use Google Analytics for website data, Shopify for sales data, the respective conversion pixels for all our ad platforms—Facebook, Google Ads, Pinterest, etc.—and Google Optimize for A/B testing. Now we need a way to implement them.
Implementation tools are separate from the pixels themselves. The marketing and analytics pixels are like tanks of water, and implementation tools are like the pipes that get data from your website to those tanks.
Just as leaky pipes can cost you money and eventually cause foundation problems for your house, getting implementation right is critical to your store’s success.
Unfortunately, there's no straightforward, guaranteed way to implement pixels for any and all stores. It’s a tradeoff between ease of use, customization, and data accuracy. How you make those tradeoffs are going to depend on the quirks of your store and the pixels you need.
Here are the options and each of their strengths and weaknesses.
Note: this post references Google Universal Analytics (GA3). We built an app to install the new Google Analytics 4 (GA4). Click the link below to add it to your store.
Get all the GA4 e-commerce reports you need in under a minute, directly from the Shopify admin for just $10 a month.
Far on the side of ease of use are the built-in Shopify plugins for Google Analytics and Facebook. Installation is as simple as checking a box and entering your Google Analytics property ID and Facebook pixel ID, respectively.
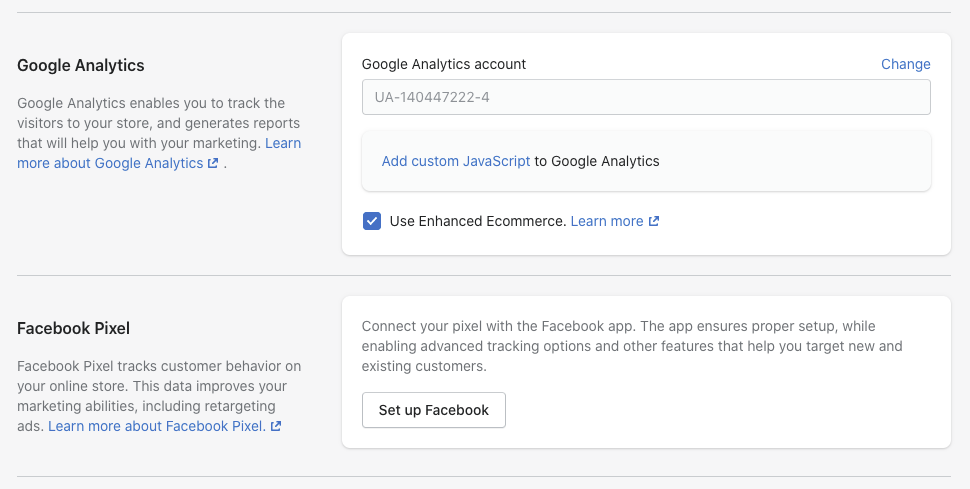
Go to Online Store > Preferences
If you have a very normal store, and by that I mean you're selling one-off products (like clothing) with a regular Shopify Checkout, then these plugins may work fine. But if you: sell subscriptions, have a custom checkout, use one-click upsells, or have an international checkout (like eShopWorld), then these plugins won’t work. For instance, if you sell subscriptions through ReCharge, the Google Analytics and Facebook plugins won’t track recurring orders at all.
More importantly, the plugins are only available for Google Analytics and Facebook. So if you use a different pixel, like Google ads or Pinterest, you’ll have to find a different solution.
Far on the side of customization, you have hard coding, whereby you or your developer installs the javascript code provided by the pixel’s documentation by adding it directly to your Shopify theme.liquid code, like so:
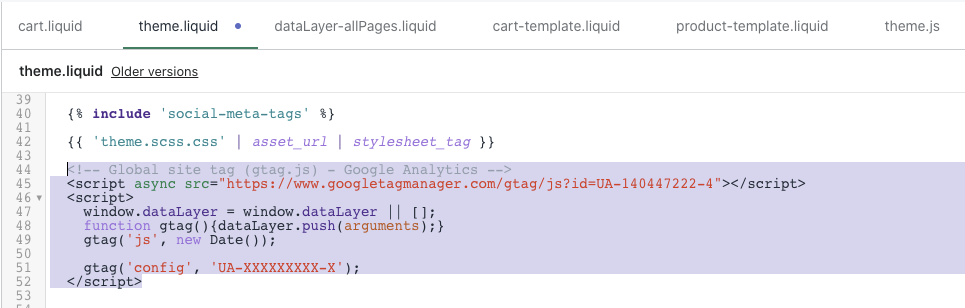
Hard coding like this gives you maximum customization—you can change this code to do whatever you like. But it causes several problems.
First, while you might be able to install a couple of basic pixels without much coding experience, you really do need to be a developer to do any customization.
Now, you might off-load that work to your development team, but then you’re at the mercy of the development team. In my experience, developers don't always place as high priority on analytics as the marketing team. It’s just another ticket in their backlog.
Development teams also typically work in two-week sprints, so the marketing team usually has to wait at least two weeks to get a new pixel implemented.
And finally, whether or not you’re relying on the development team or coding them yourself, your pixels are going to be buried in your Shopify theme code. Thus it’s not clear which pixels are firing, how they're firing, or what's triggering them without hunting through the code. For these reasons, I never recommend hard coding pixels.
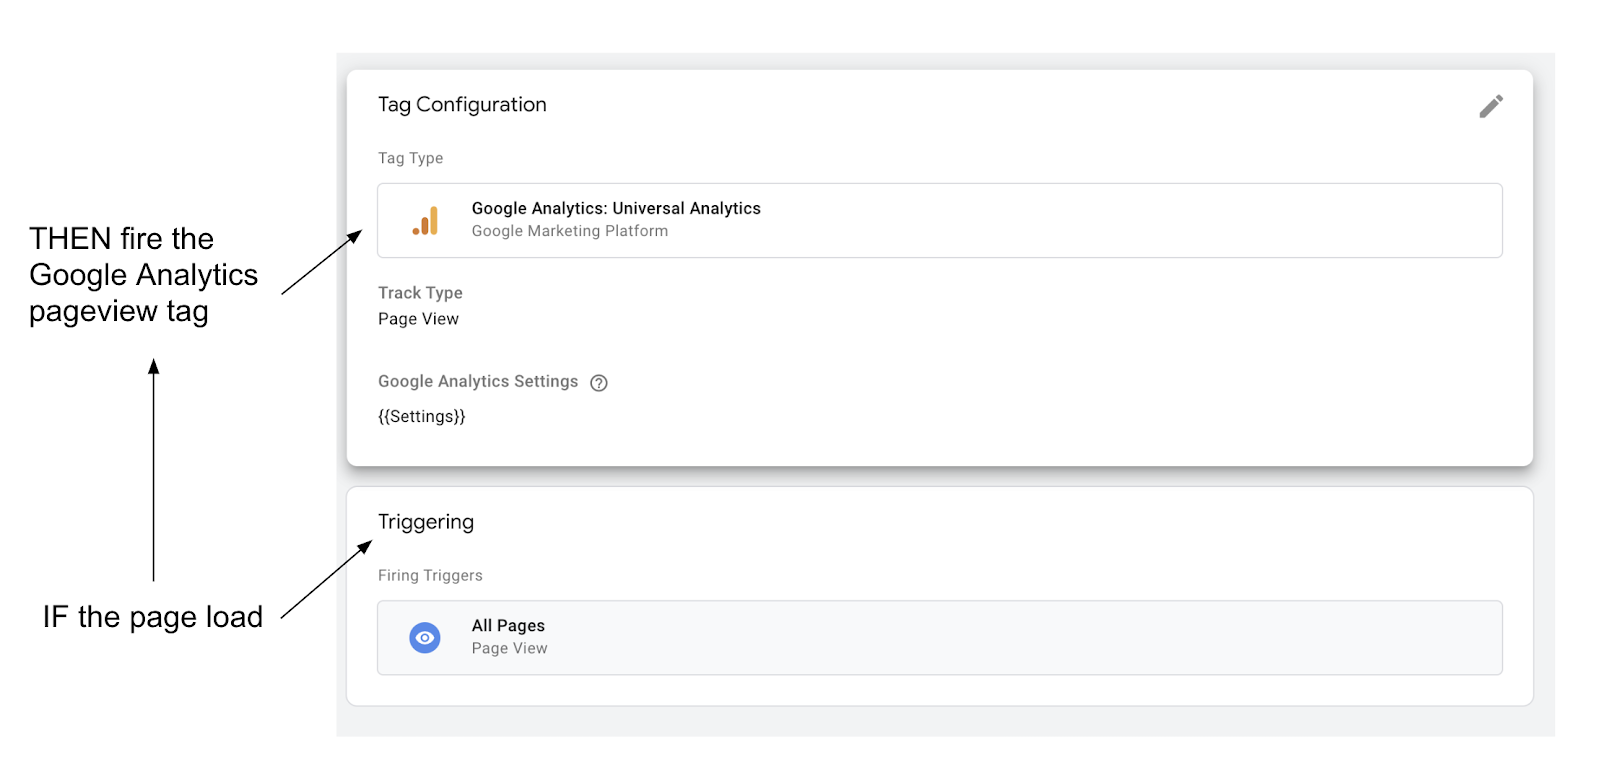
Google Tag Manager solves these problems.1
Just like Zapier or IF THIS THEN THAT makes it easy to trigger integrations based on actions
Google Tag Manager makes it easy to trigger pixels based on user actions on your site
That same snippet of Javascript above, when implemented with Google Tag Manager now looks like this:
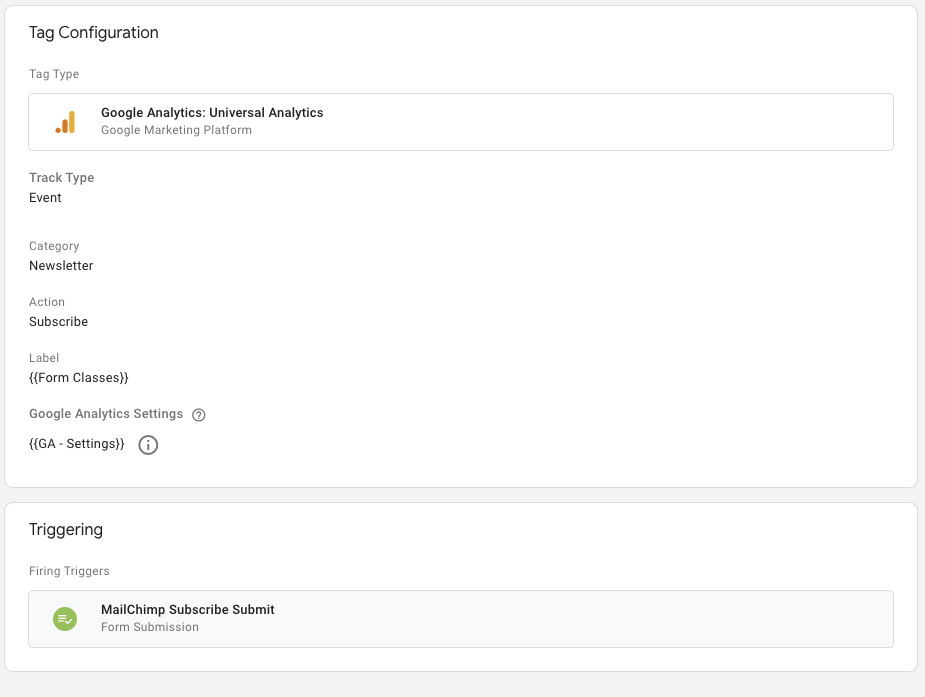
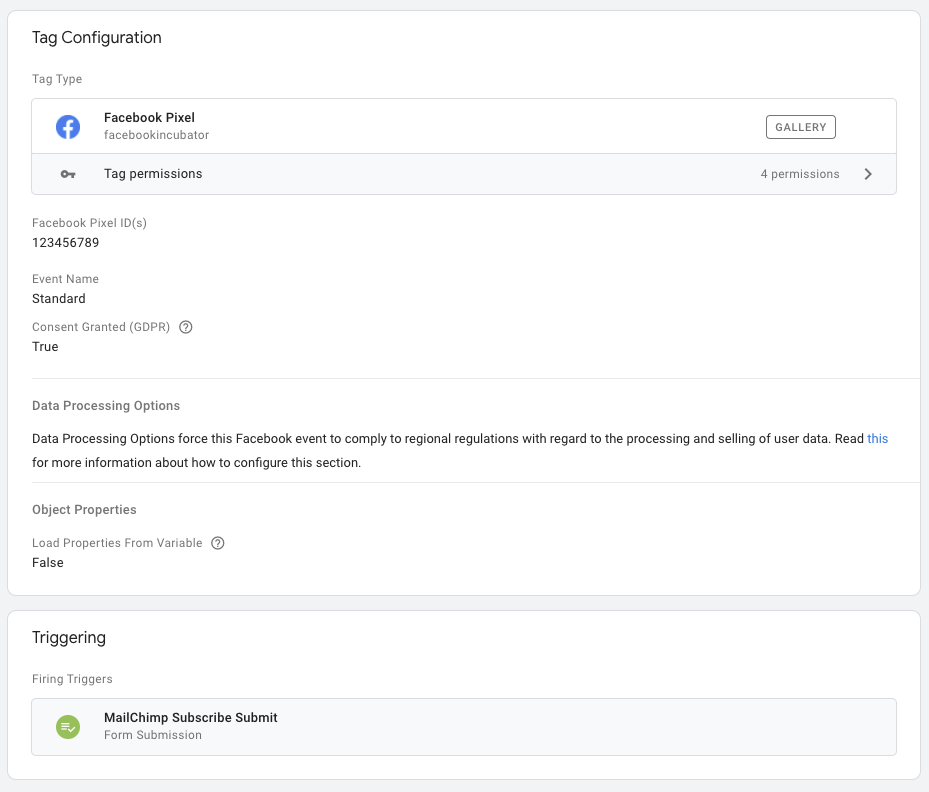
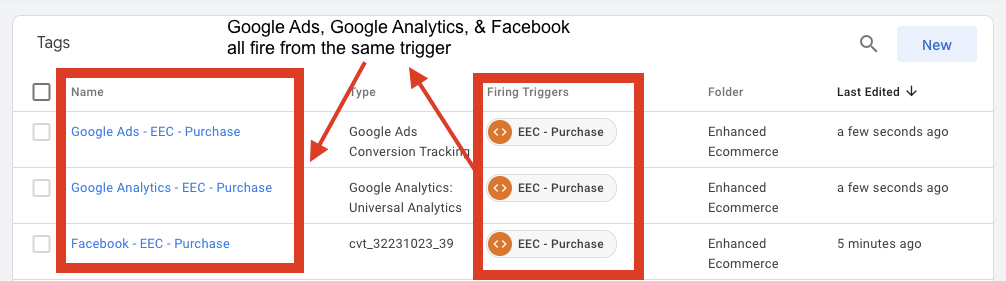
With the similar triggers and tags, tracking custom events like newsletter subscribers is a snap.
I could also use the same trigger to fire multiple pixels. For instance, I could use the newsletter trigger to track subscribers in Facebook, Pinterest, Google Ads, and more, like so:
Tracking purchases, however, is a little more complex. We could fire our purchase tag on a confirmation page and pull the price directly from the page, like so:
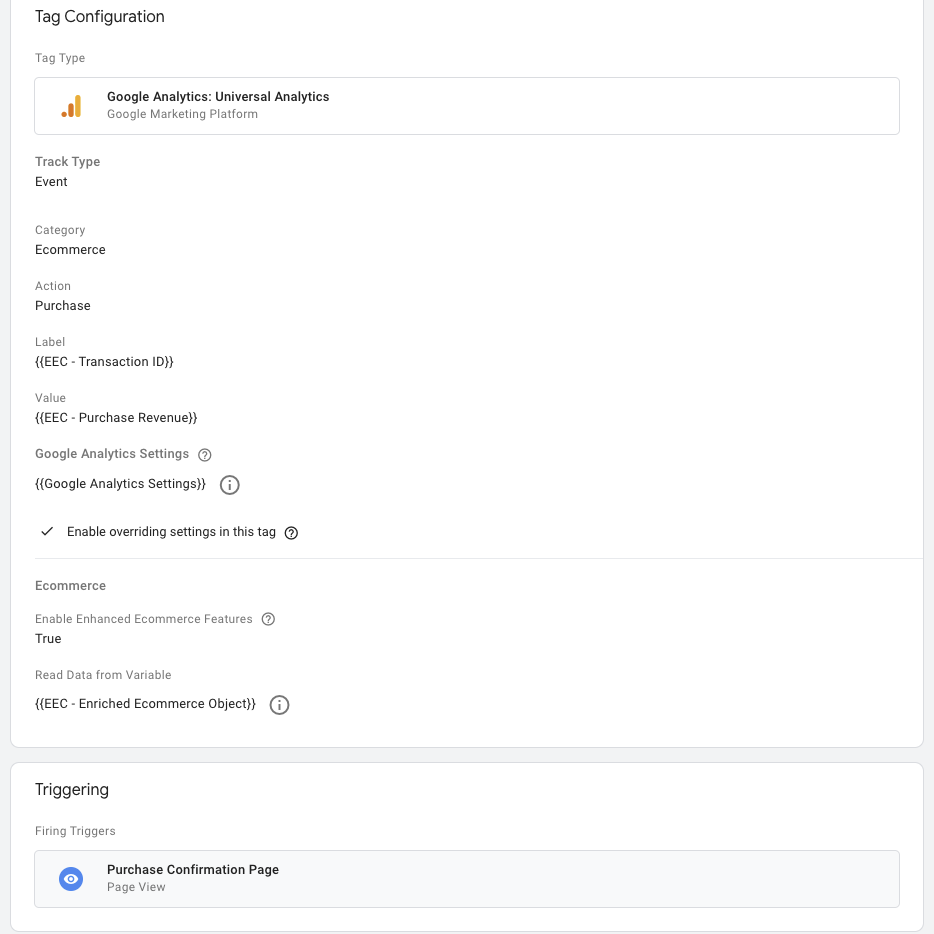
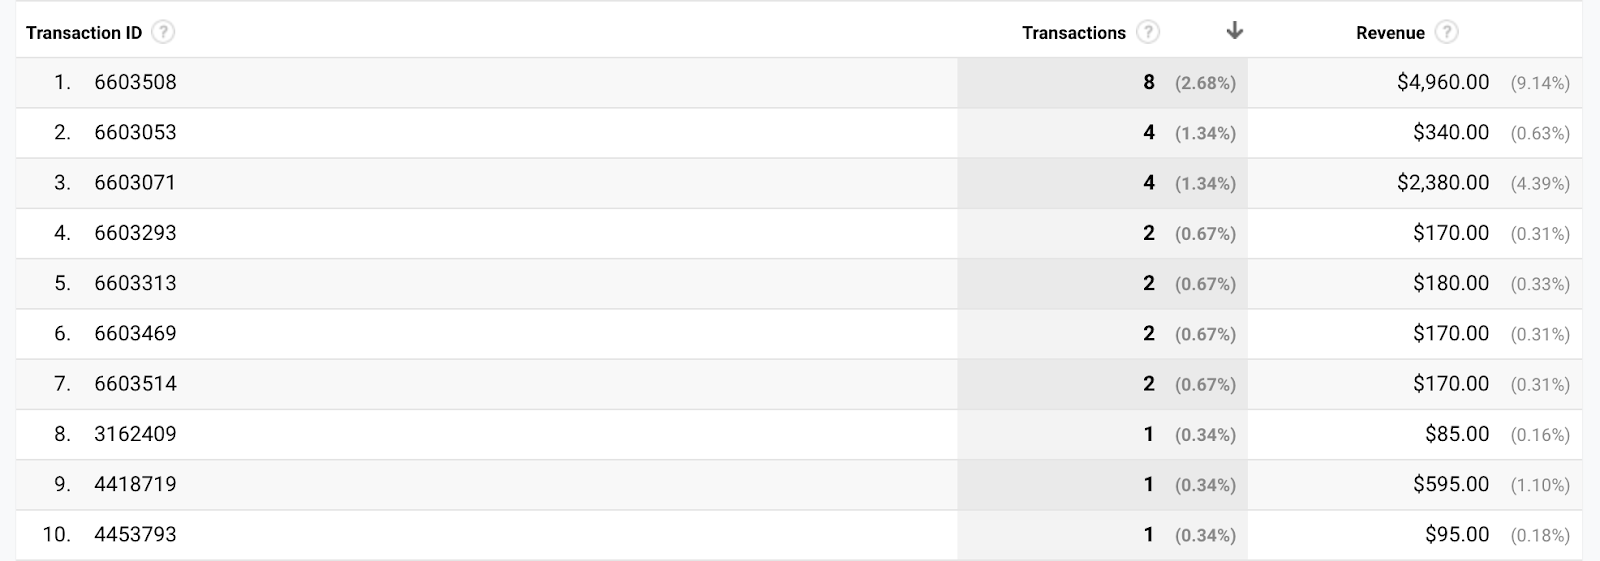
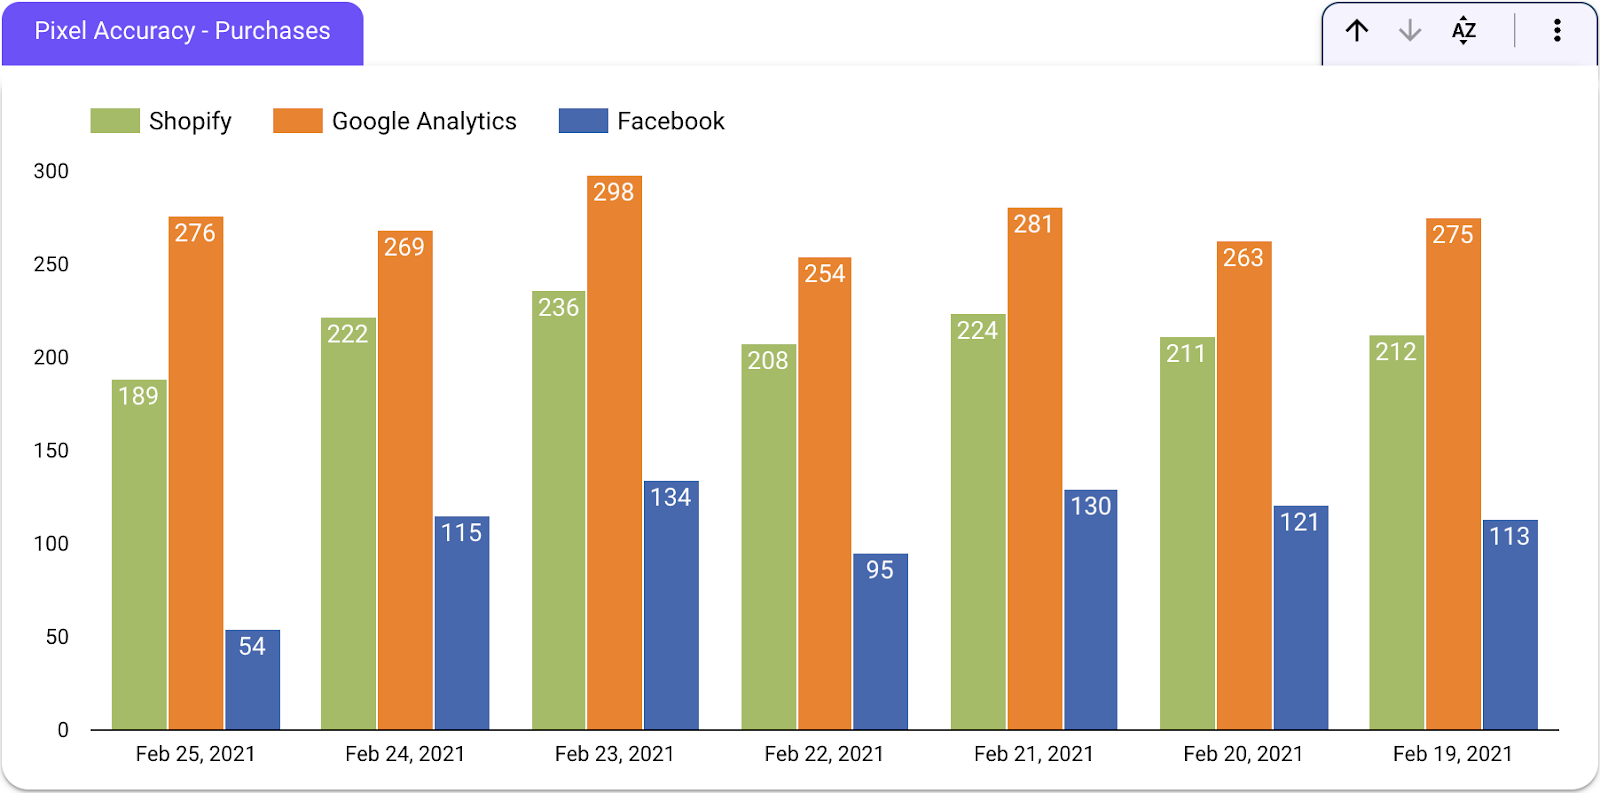
But the confirmation page is really a proxy for what we want to track, namely purchases. The problem with proxies like this is that they can fire when a user doesn’t make a purchase. For instance, with the purchase tag above, when the customer reloads the confirmation page or clicks on a confirmation email and ends up back on the confirmation page, an additional purchase event will fire. When that happens, you’ll see that there are multiple purchases with the same transaction ID in Google Analytics.
That will also throw off your conversion rate optimization tools, such as Google Optimize.
To track actual purchases instead of a proxy, we need to use the data layer.
The data layer lets us push information from the backend of our website (in this case, Shopify) to Google Tag Manager. For instance, to push a purchase event with all the relevant data about the purchase, we’d add a little bit of code to our Shopify theme, like this:
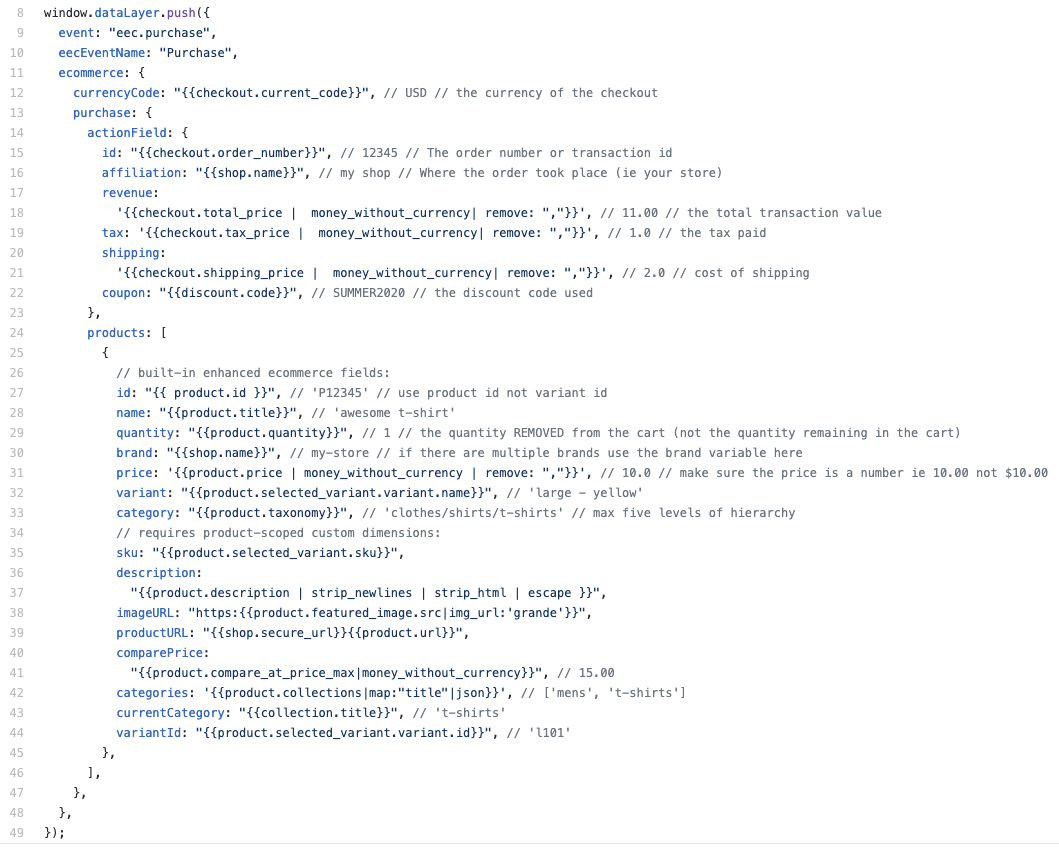
Because this is custom code, we can fire the product event whenever we like and include whatever product data we’re interested in, giving us maximum flexibility.
While it does require coding, it's still much better than hard coding every pixel because we can use just one data layer event to fire all of our marketing pixels. For example, we can use the same purchase event in the data layer for Google Analytics, Facebook, and any other pixel, like so:
Because we’re using the same event, we’ll significantly reduce data discrepancies across our pixels.
Most Shopify stores can use the instructions and code here to send all ecommerce events to the data layer—except add to cart events, which vary too much from store to store.
Google Tag Manager gives you maximum flexibility with minimal reliance on development teams. When used with the data layer, it pipes accurate data to all of your pixels.
But there’s still one big problem with Google Tag Manager. It runs in your visitor’s browser. As such, as with hard coded events, it will fail for any visitors with ad blockers.
More importantly, it will miss all events like recurring subscription orders or refunds that occur outside of the visitors browser.
This is a fundamental weakness of all browser based (or client-side) tracking. The only way to solve it is to move to server-side tracking.
Littledata is a Shopify app that fires Google Analytics events server-side. That means, instead of relying on events that occur in the visitor’s browser, it fires events when something happens in your Shopify database. For instance, when a ReCharge recurring order is added to your Shopify database, Littledata fires a purchase event in Google Analytics.
Littledata isn’t free, but it is very easy to install. Once you do so, you theoretically get perfect data in Google Analytics from that time forward.
As you might have guessed, the ease of use and accuracy of Littledata comes at the expense of customization. For one thing, unlike the data layer, you can’t customize anything about your ecommerce data. For instance, you can’t add custom product dimensions or metrics.
More importantly, however, the Littledata app only works for a handful of pixels. To connect it to other pixels, you need another app called Segment.
Segment is similar to Google Tag Manager. It has triggers (called data sources) and tags (called destinations).
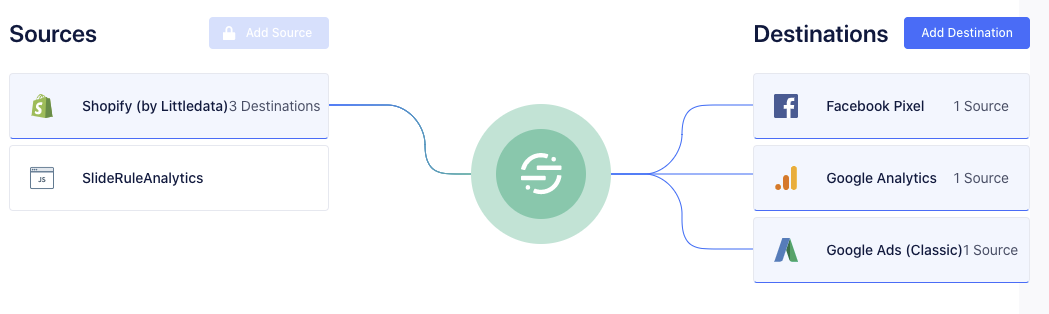
As you can see, with Littledata as our data source, we can send events from our Shopify database to multiple pixels.
Because Segment/Littledata fires server-side, we don’t have the browser problem of Google Tag Manager. However, it still comes with some costs.
First, while Segment/Littledata is easier to set up than Google Tag Manager, it’s harder to install than the plugins or just Littledata.
Second, while you can send events to multiple pixels, you can’t send them to any pixel. It’s only compatible with some pixels. If you use a pixel that isn’t on the list, Segment/Littledata may not be a good option for you.
And finally, while Segment/Littledata works great for all ecommerce events—add to cart, checkout, purchase, etc.—it doesn't track custom events. So, if you want to track newsletter subscribers, you're going to either use an additional tool like Tag Manager or add custom code for these events with Segment.
So how do you choose which implementation tools to use? There’s no one-size-fits-all solution, but here are a couple of things to consider.
First, you should think about timing. When you're just starting your store, getting perfect analytics and pixel tracking might be pretty low on your list of priorities. If that's the case, you might just use the Google Analytics and Facebook plugins, because you can click the buttons and get started right away.
If you do that, I recommend creating trip wires. For instance, “when we start doing over $10,000 in revenue a month, we're going to review our analytics implementation strategy and decide if we need to upgrade.” I’d recommend roughly the following trip wires:
Second, consider how much customization you require. If you use a pixel that's not available in the Segment/Littledata destinations list, you're going to have to use Google Tag Manager. If you need to track recurring orders from subscriptions, you have to use Segment/Littledata. If you need both, you’ll need to come up with a hybrid “good enough” solution.
Third, start small. Don't try to implement everything at once. It makes your implementation strategy unnecessarily complicated. You can always come back later and add pixels or change tools as needed. Don’t plan on setting and forgetting your pixels and implementation.
Finally, if you can, use only one tool for implementation, many of my clients use a hybrid solution. For example, Littledata for Google Analytics, Google Tag Manager for Criterio, and the Shopify plugin for Facebook.
While this can work, it decreases the transparency of our pixel setup. When something goes wrong, you have to check three different tools. It also causes more discrepancies across data sources because Google Analytics, Criteo, and Facebook are all firing based on different events.
While no implementation strategy or tool is perfect, picking the right one based on your store can get your data flowing to where you need it quickly and accurately enough to improve your store’s profitability.